Monday, September 22, 2014

Happy Equinox

Happy Equinox: Monday, September 22, 2014 at 10:29 PM EDT (Seymour, CT)

Illustration image

http://www.timeanddate.com/calendar/september-equinox.html#what


Daylight 
6:40 AM – 6:49 PM
12 hours, 9 minutes

Saturday, September 6, 2014

Crabby Day

It turned into a Crabby Day for the Short Hike at Ash Creek Open Space in Fairfield which is home to Aspetuck Land Trust’s Great Salt Marsh Island Preserve.


Wednesday, July 23, 2014

Treefort Lift (or Pulley)

The following is a list of steps I used in building a lift for the treefort I built last summer.  And yes it was my son's request or wish.  This was a work in progress type of endeavor as the plan kept changing as I kept getting further along.

Step 1
Secure a 2x6 pressure treated beam to a tree and 4x4 support post.

Use a 6 in long 1/2 in diameter galvanized lag screw to mount the beam to the tree.  Cut an oval hole in the beam to allow for tree movement.  

Step 2
Secure the beam to the 4x4 using wood brackets and 5/16 bolts.  Brace the 4x4 with clamps at this point.


Step 3
Secure the 4x4 to the deck using wood brackets and 1 5/8 in deck screws or 2 1/2 in deck screws depending on location.  Also, use metal elbow clamps for extra support and to mount the brackets to the deck.

Also, a wood block was attached to the 4x4 as a holder for the rope.


Step 4
Add a support from the 4x4 to the beam.  Use metal brackets and screws for mounting.


Time to add the main pulley (rated 440 lbs.) to the support beam.  Use two angle clamps and 3/8 in bolts.

Step 5
At this point you could be done and just add a bucket to the pulley.  Of course that wasn't good enough.  Construct a platform using 2x4s and deck planks.  Next, add guides so the platform does not spin when you raise or lower the platform.  The guides are 10 ft 1/2 galvanized pipes mounted to the deck railing.  The platform is attached to the guides with 3/4 in pipe clamps.


Note: more pulleys increase the mechanical advantage.  I purchased the ones shown above from The Home Depot, however, I have a double wheel system on order which should make it easier to lift little boys and such.

Good luck for your own project. Below is list of tools used during the construction.

Tool List
Hammer
Table saw
Compound saw
Clamps
Two cordless drills/screw drivers
Level

Friday, April 4, 2014

shscatchem: And The 2014 Winners Are...

What happened to my room?


Each year the students make a molecular and brochure of their favorite molecule.  We then have a voting period over two days where current and former students as well as teachers vote on the models.  The votes are entered on a Google form accessed using any internet device.  Congratulations go out to all my students for producing these wonderful representations. 

Click to the link below for the full winners...

shscatchem: And The 2014 Winners Are...: What happened to my room? Each year the students make a molecular and brochure of their favorite molecule.  We then have a voting p...

Saturday, March 8, 2014

Bugs in the Snow

Look carefully, you never know what you are walking over!

While hiking on a trail after sampling some fresh maple syrup at Flanders Nature Center in Woodbury I looked down at what I thought were specs of dirt on the snow.  However, on closer examination I noticed 'they' were jumping (must not be dirt).  Quite a shock to me as I have never seen this phenomena before.  I recorded a video (above) although it is hard to see the critters jumping.

Back home I did some internet searching and discovered they are a type of insect known as a Springtail (they are nicknamed snow fleas although they are not fleas at all). I also discovered they very helpful for soil and are found on every continent.

I have attached a close-up from science perspective website of what they look like.


Saturday, January 18, 2014

Does Putting Baking Soda and Vinegar on Your Face Make Your Head Burn Up?

This was the question my son asked me yesterday when picked him up from daycare to which I replied, “I don’t know!  We should do some experiments.”  It’s a good question and questions are what science is all about.  I suggested that we DO NOT start with the original question but do some preliminary tests.

We first added a tablespoon (15 mL) of baking soda (sodium bicarbonate, NaHCO3) to a cup.  Next, we added a quarter cup (~60 mL) of vinegar (dilute acetic acid, CH3COOH) to a second cup   and measured its temperature with a digital meat thermometer (Thermoworks).  Finally, we mixed the two compounds together while continually monitoring the temperature.  Of course we repeated this experiment to make sure our results were repeatable.

They were as follows:
Trial
Initial Temp (F)
(before mixing)
Final Temp (F)
(after mixing)
1
60
55
2
61
56
3
61
55

These results were surprising to me as the reaction caused a lowering of the temperature.  We found out that putting baking soda and vinegar on your face would not cause your face to burn up although I still WOULD ADVISE AGAINST this as excess vinegar could get into your eyes and inflict pain while causing damage.  As a safer backup demonstration I put some baking soda into the palm of my hand and added vinegar (over the sink).  It did cool off as fizzed.  Of course Julian needed to feel this for himself...

The other thing we discovered was that the reaction absorbs heat from the surroundings which means that it is endothermic.  We could have looked all this up but it was more fun doing the actual experiment...

Also, for those who care:
The fizzing is the carbon dioxide gas that is produced during the reaction.
NaHCO3 + CH3COOH → NaCH3COO + H2O + CO2

Note: it produces carbonic acid (H2CO3) first which quickly breaks down into water (H2O) and carbon dioxide (CO2)

Tuesday, December 3, 2013

Hierarchy of Shared Folders using Google Drive

Our school, Seymour High School (SHS), recently and unofficially began using Google Apps for Education.  As such we were given SHS Google accounts.  If you already had a Google that you created using an SHS email, the new account assimilates the old account into the new one.  May not be what you wanted, oh well...

If you created it with a different email, you are given a choice to merge them.

I chose to keep them separate but since I have been using Google for years, I have amassed lots of folders and docs that a want use.  Google makes it very easy to share the stuff that I created on my personal account with the SHS account.  My personal Google Drive is still separate from my SHS Drive, but some folders are shared in both locations.

Sharing folders (and docs) with students was the next big challenge to overcome.  Fortunately, Mike Oberdick, Eric DeMarco, and Mike Sirowich were already on this.  The solution they came up with is to create a folder and share it with the entire class.  Anything put in that folder is accessible to anyone you shared it with.  Cool, just put docs there and everyone has it, save paper...  BE CAREFUL, however, even private folders put under that folder is viewable.

Next, have each student create a folder and share it with you.  This allows the student to save docs or any assignment to that folder and it will be accessible to you to comment on or grade.  These folders should NOT be saved in the shared class folder but in a separate folder so it is only between you and the student.  

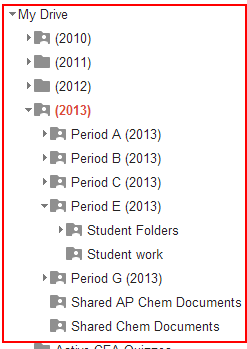
Example
Below is a copy of my SHS Drive.  The folder marked (2013) shows this year’s classes.  The folder marked Shared AP Documents is shared with the entire class - everyone in the class has access to whatever is put in there.  The folder marked Period E (2013) is private - although shared with my personal Drive.  The folder marked Student Folders is also private, however, saved in that folder are the individual folders that the students created and shared with me.