Tuesday, December 3, 2013

Hierarchy of Shared Folders using Google Drive

Our school, Seymour High School (SHS), recently and unofficially began using Google Apps for Education.  As such we were given SHS Google accounts.  If you already had a Google that you created using an SHS email, the new account assimilates the old account into the new one.  May not be what you wanted, oh well...

If you created it with a different email, you are given a choice to merge them.

I chose to keep them separate but since I have been using Google for years, I have amassed lots of folders and docs that a want use.  Google makes it very easy to share the stuff that I created on my personal account with the SHS account.  My personal Google Drive is still separate from my SHS Drive, but some folders are shared in both locations.

Sharing folders (and docs) with students was the next big challenge to overcome.  Fortunately, Mike Oberdick, Eric DeMarco, and Mike Sirowich were already on this.  The solution they came up with is to create a folder and share it with the entire class.  Anything put in that folder is accessible to anyone you shared it with.  Cool, just put docs there and everyone has it, save paper...  BE CAREFUL, however, even private folders put under that folder is viewable.

Next, have each student create a folder and share it with you.  This allows the student to save docs or any assignment to that folder and it will be accessible to you to comment on or grade.  These folders should NOT be saved in the shared class folder but in a separate folder so it is only between you and the student.  

Example
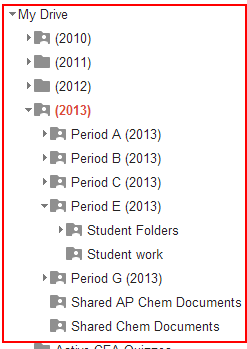
Below is a copy of my SHS Drive.  The folder marked (2013) shows this year’s classes.  The folder marked Shared AP Documents is shared with the entire class - everyone in the class has access to whatever is put in there.  The folder marked Period E (2013) is private - although shared with my personal Drive.  The folder marked Student Folders is also private, however, saved in that folder are the individual folders that the students created and shared with me.


Friday, November 1, 2013

Thermite 2013

Thermite Demo for 2013!  It's Hot...

This demo was performed on October 22, 2013.  The thermite mixture consisted of 25 g of Al and 75 g of Fe2O3.  The ignition reaction was made with mixture of KClO3 and sugar and a couple of drops of H2SO4.

Thursday, October 17, 2013

shscatchem: Rainbow Flame

shscatchem: Rainbow Flame: Take Chemistry! This neat looking rainbow flame was produced by some students after the completing Flame Test test lab.

Monday, October 14, 2013

The Underground Map of the Elements

Mark Lorch, a blogger form the Chemistry Blog, put together the most incredible arrangement of the elements I have seen.  Each element is a station on the railroad line and has shared properties with other elements on the line.


I think a great activity for my students will be to have them critique this representation and some of the other odd periodic tables out there...

For a better version the the map, use the following link: Map

Sunday, September 22, 2013

Fun with the FunScope

We purchased a FunScope made by Orion Telescopes for my son's birthday and had our first astronomy night.  Although the scope is small (76 mm mirror), it very maneuverable especially for a nine year old.  Nice views of Denub, Vega, and Altair.


Monday, August 26, 2013

Not all white light is the same!

In a recent post on the Chemistry BlogKenneth Hanson uses Alexandrite (BeAl2O4), a gem quality form of the mineral Chrysoberyl, to explain how different types of 'white light' make objects appear different colors. 

Alexandrite Effect: Not All White Light is Created Equal


Link: Chemistry Blog

Tuesday, August 13, 2013

Recent Night Views

Although I saw only one meteor during the last couple of nights (clouds rolled in at prime meteor viewing), there were pleasant night scenes...

Crescent moon with Spica (closest to moon) and Saturn.

Crescent moon with Spica (closest to moon) and Saturn.

Crescent moon

Cygnus (constellation at the top)

Cygnus (constellation at the top) with the Milky Way

Saturday, August 3, 2013

Tree House (or Fort) Construction

The following is a list of step I used in building a tree house or fort at least for this summer.  I took upon this endeavor because my son saw tree houses in some of his favorite cartoons.  I used the following sources for design and information:
1) Mike Swenson - friend who works with my wife
2) Makendo
3) Eztreehousplanse
4) Tree Houses and Play Houses

Step 1
Install and secure 4x4 post, clamp 2x6 support beam, mount to tree, add quick dry cement to post, mount beam to post.

Select an appropriate location

Mount 2x6 PT Beam to tree.  Use 8 in long 3/4 in diameter galvanized lag screw (thanks Nutty Co. in Derby, CT) and secure to tree.  Notice the oval cut in the wood.  This was done in order to allow for tree movement.    

Install 4x4 post.  Not surprisingly, I hit roots about 18 in, but I installed it in Quickcrete anyway.
Step 2
Install and secure 4x4 posts, clamp 2x6 support beams, add quick dry cement to posts, mount beams to post (level with step 1 beam).

Install two additional 4x4 posts for front support.  
Use two 6 in  long 1/2 in diameter lag bolts
Step 3
Install and secure 4x4 post, clamp 2x6 support beam, mount to tree, add quick dry cement to post, mount beam to post (level with step 1 and 2).


Level support beam to the first support beam connected to the tree.  Add second support beam.
My helper is installing a pilot to go through both support beams and 4x4.
Step 4
Install 2x6 outer perimeter joists, square off, install 4 inner 2x6 joists.

Set ten foot 2x6 joists spaced 18 in apart on top of support beams.  Use 3 in deck screws and mount front and rear floor joists to the cross joists. 
Connect floor joists to beams using rafter ties and galvanized nails.
Add another support beam and connect to the front side of the tree and a forth 4x4 post set in Quickcrete.  Because I was not able to dig very deep on any post (below 18 in), I installed a 4x4 brace to the front 4x4 posts.  
All joists were secured with joist hangers.
Step 5
Add more supports and build stairs.

Mounted a 2x4 brace with a 6 in 1/2 lag screw.


Constructed the stairs using 2x6 stringers (rails) and treads (steps) and 3 in deck screws. Used 1x4 support cleats nailed to the rails for additional support.

Step 6

Add the floor.


Have helper inspect the floor.

Used standard 5/4 deck boards connected to the floor with 2 1/2 in deck screws.
Step 6
Add the railing.


Added the guard rails using 3/8 in bolts mounted to the floor joists.  The balusters were mounted to the 2x4 rails using 2 in galvanized deck screws.  The 2x4 rails were mounted guard rail beams and to the each other with 3 in deck screws.

It's done for now.  At a later date I plan to install a 1x4 rail cap to the guard rail.

Addendum: Guard rail cap and more bracing...


Good luck for your own project. Below is list of tools used during the construction.

Tool List
Hammer
Circular saw
Table saw
Compound saw
Clamps
Two cordless drills/screw drivers
Level
Jig saw

Sunday, July 7, 2013

Google Sites vs. Wikispaces

I currently use both of these applications as a supplemental webpage to the Edline webpage that Seymour provides for us.  I started using Wikispaces several years ago added numerous pages with links and such to the main page as a way to house all of my online materials in one place.  Not to mention that prior to Edline our school kept switching our web provider (remember FinalSite) and I got sick and tired of re-creating websites for the latest and greatest.  My Wiki homepage was exactly what I needed and I slowly added content for myself to use but more importantly for the students to use.


Last year, however, I started using Google Sites and created a new Google homepage because I kept on having formatting issues with my Wikispace pages, in particular with font sizes.  It was really becoming quite annoying and wasteful as I would have to go into the HTML code and to fix it (or try).  I didn't have any of these problems using Google Sites, even when I cut and pasted content from other sources.  The graphical user interface (GUI) is much more straightforward.  For now, Google Sites is the winner!


Note: I did not choose Google just because our school system will be using Google Apps for Education next year nor is it because they gave me a free trip to Bora Bora and a corvette.


So Why Not Use Only The Google Site?
I haven’t shut down my Wiki homepage because of vast amount of stuff I have acquired over the years and it would be very time consuming to move it (lazy-?).  Also, just in case Google reinvents itself in a bad way, I still the other site.  The two homepages serve different purposes anyway and I have links from my Wiki homepage to my Google homepage and back again.


Advantages of Google Sites!
My Google sites homepage is setup differently than the Wiki in that I have put my daily assignments along with links to all handouts onto the site, thus my class syllabus is online.  This was incredibly easy since my daily lessons are done using Google Docs, I simply cut and paste into the Sites page. The following is the link to last year’s Chemistry Syllabus: Chemistry (2012-2013).  


One Last Note on Google!
I created the AP Chemistry Summer Assignment on Google Docs and asked the incoming students for their email addresses.  Approximately 70% of them already had gmail accounts (and 90% had Google accounts) which means I was able to share this document directly with them.  I made a copy of the document so I can post answers or whatever else I want to share with them.  The really neat thing is you can set the document up so students can comment on the document or even edit the document.  Great for student collaboration. For more on this type of document sharing using Google see the Tech Messengers Podcast by Mike Oberdict and Eric DeMarco.

Tuesday, July 2, 2013

The New Summer Brew


This year's home chemistry experiment is an India Pale Ale (IPA).  The first part was a success but I won't know how it really turned out until fermentation process is complete in a few weeks.  Also, I had a little helper who says he loves making beer, at least until he gets bored...

Friday, June 28, 2013

Fringe Benefits for a Teacher


It's easy for teachers to get overweight, especially at the end of the year and we can't except monetary rewards...Very Tasty...

Tuesday, June 4, 2013

The Blog of Phyz: NGSS high school physical science breakdown: Take ...

The Blog of Phyz: NGSS high school physical science breakdown: Take ...: The Next Generation Science Standards  (NGSS) have now been finalized. I would be surprised if California did anything other than to adopt t...

Adding to Dean Baird's
informative post with regard Next Generation Science Standards (NGSS), Connecticut, in particular Seymour High School (SHS), is in the process of reviewing these Science Standards in all likelihood, will adopt them.  However, there will be some challenges that our department and other's will face.

For example, one thing that has not been  addressed yet is whether next year's 10th Graders will take the current Connecticut Academic Performance Test (CAPT) or simply wait until they are in 11th Grade and just take the new NGSS Test.

Also, because of additional content or Performance Expectations (i.e. Earth Science, Space Science, and Environmental Science which have been incorporated into Life Science and Earth and Space Science Core Ideas) significant changes in course offerings and/or course content will have to occur. This is not a bad thing, however, especially since Earth and Space Science are back after being removed by the wisdom of the CAPT originators.

We have finished comparing our current science course offerings with the Skills and Content of the NGSS in order to identify deficiencies.  Of course there were many areas which need modification and I am not sure how the robust nature of the Skills and Content will be addressed properly before the end of a student's Junior year in High School.

Stay tuned for more when ever we know more...


Saturday, June 1, 2013

Who Said Geography First

JUNE 2013


I’ve always liked Eratosthenes since I first heard about his accomplishments from Carl Sagan while watching Cosmos.  Eratosthenes was Greek scholar born in Cyrene (276 BC) which is located in present day Libya and died in Alexandria (194 BC), the capital of Egypt during this time.  He was educated in Athens and appointed as the third Chief Librarian of the Great Library of Alexandria in 240 BC.  While at the library he wrote a book about the world, called geography, and introduced the climatic concepts of torrid, temperate, and frigid zones.  He is most famous for calculating the circumference of the earth by comparing the angle of the shadow of the sun at summer solstice noon at Alexandria and Syene (directly south), and knowing the distance between the two, he calculated Earth is 250 000 stadia (~25 000 miles or 40 000 km).


(note: the diagram incorrectly lists 35 000 Miles)

Other claims of fame include calculating the tilt of Earth’s axis at 23.4º and possibly the distance to the sun.  He also created the first world map incorporating latitude and longitude.  Finally, he along with his friend, Archimedes, made several contributions to mathematics including the Sieve of Eratosthenes which is a simple algorithm that determines prime numbers.  One of Eratosthenes philosophical beliefs was that there was good and bad in all nations and criticized Aristotle for arguing that Greeks are better and should keep themselves racially pure.

sources:
About: Eratosthenes

Wednesday, May 1, 2013


James Hutton - The Great Observer - This Doc Rocks

MAY 2013
James Hutton was born in Edinburgh Scotland, in 1726 and died in 1797.  He was interested in Mathematics and Chemistry from a young age.  At age 17 he apprenticed with a lawyer (I guess he wanted to try something else) but was more interested in doing chemical experiments thus became a physician’s assistant.  Eventually he earned a Doctor of Medicine degree at Leyden in 1749.  After getting his degree, Hutton moved to Berwickshire farms, inherited from his father in 1713, where he performed more chemical experiments and introduced new farming practices.  It is here that he became interested in studying the earth.

In 1768 Hutton moved back to Edinburgh and began making some of the most profound hypotheses of Earth’s structure using his extraordinary observational powers.  He described the formation of sedimentary rock and deduced how granite penetrations in metamorphic schist were younger and intruded into it in a molten state.  He also came up with the Theory of Uniformitarianism - geological forces at work in the present day are the same as those that operated in the past.  Proposed internal heat and pressure within Earth formed igneous rocks, causes stratified layers to be tilted, and made mountains rise.  Hutton made numerous other contributions in in the fields of geology, meteorology, and the development of evolution among others.  Of course not everybody was not on board with his thinking especially since he described an Earth that far older than the 6,000 year old Earth as described by Bishop Ussher.

sources:
Profile: Hutton

Monday, April 22, 2013

That Which Sparkles


Figure 1

Lately, while taking my dog on one her numerous walks, I have been noticing an increase in the sparkles on the the side of the road and on the lawn near the road.  Notice the center of figure 1. There has always been a few of these tiny shiny fragments but not this much.  Even when I walked her in the dark with my headlamp, the reflection was quite impressive.  My hypothesis is the town has a new source for their winter salt-sand mixture, one that has a high mica content, or more specifically muscovite (the mineral responsible for the sparkles).  Of course to check this I would have to contact the town and they might think I am nutcase and also who has the time for that.

Muscovite, (KAl2(AlSi3O10)(F,OH)2) is a soft, platey, silicate mineral common in granitic type rocks.  Flat, sheet, or platy silicate minerals are classified as phyllosilicates.  Muscovite is colorless but can be lightly shaded green, brown, yellow, or even red unlike the other main mica, biotite (K(Mg,Fe)3AlSi3O10(F,OH)2), which is dark or black. Notice Figure 2 on my son's hand.
Figure 2
If you are still interested in muscovite you might be a closet geologist and I recommend reading a mineralogy textbook.  One last thing, the name muscovite comes from the use of the mineral for glass in Russia.
Figure 3