Wednesday, August 29, 2018

Wizard Nebula in SHO

The Wizard Nebula is located 7200 light years away and surrounds the open star cluster NGC 7380. The interplay of stars, gas, and dust appears to some like a fictional medieval sorcerer hence the name Wizard. The region spans 100 about light years which makes it appear larger than the Moon.  This object was very dim and probably not the best object to experiment with this type of imaging.  I had numerous problems imaging but in the end I learned a great deal and feel much more comfortable using the camera, taking flats, locating objects, and plate-solving.

As can be seen on the processing front, I need a lot of practice with PI and PS.  I was very happy how the Dumbbell turned out a few weeks ago and thought this would be just as easy.  There was nothing easy with this object, from collecting the subframes to final processing. Version 1 was done mostly in PI where I did minor processing on the individual NB channels prior to combining.  Version 2 was stacked framed and aligned in PI but the processing on the individual NB channels was done in PS as was the combining.  Neither of these images are anything to write home about but I did get something.  We are expecting some cloudy weather so it looks like I will have more time to experiment with doing another version...

Version 1

Version 2

Version 3

Version 4

NGC 7380- Wizard Nebula - SHO (Hubble Palette) 
Location: Home Monroe, CT
Date: 8-23-18 (Ha, OIII), 8-24-18 (OIII, SII)
Camera: ZWO ASI1600MM-Pro
Telescope: Orion ED80 80mm f/7.5 Apochromatic Refractor Telescope
Barlow: None
Focal Length: 600mm
f/7.5
Focal Reducer: Orion 0.8x Focal Reducer for Refractor Telescopes
Mount: Orion Sirius EQ
Filter Wheel: ZWO EFW 8x 1.25"
Filter: ZWO Ha, OIII, SII
Autoguiding: QHY-5L-II-M attached to an Agena 50mm Guide Scope with Helical Focuser
Exposure: Ha 41 x 180s, OIII 39 x 180, 38 X 180
Gain: 139
Offset 21
Temp: -10 C
Processing: APT, PixInsight and Photoshop
https://kurtzeppetello.smugmug.com/

Sunday, August 19, 2018

The Wizard Nebula using 8-Bit Data

As I mentioned to another Astrobin friend recently, learning to use a new camera, new camera control software, and new processing software all at the same time was a brilliant move on my part, NOT! I somehow reset camera to record in 8-bit rather than 16-bit so all of the 3.5 hours of data is bad or unusable. It took me two days to find out why it would not stack (error - no stars found), I posted on CloudyNights and it took a while before someone analyzed one of the sub-frames and discovered file format is 16-bit integer but the numbers only go from 0 to 255 (= 8 bit). I did manage to stack these without the flats. The SII looked like the stars were way over blown, the Ha looked OK, and the OIII looked like a dull gray hunk of wax with little specs of stars. With all that I decided I would process the Ha data so here it is - at least to get more practice with PI. I plan on re-doing this object this week if it clears up.

Also, I continue to use SGP for Plate-Solving and APT for capturing the images. This object was hard to locate as it is so dim it did not show up in live view or even the individual subframes using the APT software. APT has Plate-Solving too and it works well except it does not center the object on its own. That is you take reference image, press solve, and it solves the frame but does not adjust it to the object to the center like SGP which does it automatically. For easy to see objects like globular clusters it is no problem but for dim nebula it is nearly impossible. With my DSLR and BYEOS, the live view interface was exceptional and I was usually able see something of a nebula without viewing it in another program. Oh well. I took it face value the SGP centered on it as I was not sure of anything until I brought into PI and there it was dead on!

NGC 7380- Wizard Nebula-Ha
Location: Home Monroe, CT
Date: 8-16-18
Camera: ZWO ASI1600MM-Pro
Telescope: Orion ED80 80mm f/7.5 Apochromatic Refractor Telescope
Barlow: None
Focal Length: 600mm
f/7.5
Focal Reducer: Orion 0.8x Focal Reducer for Refractor Telescopes
Mount: Orion Sirius EQ
Filter Wheel: ZWO EFW 8x 1.25"
Filter: ZWO Ha
Autoguiding: QHY-5L-II-M attached to an Agena 50mm Guide Scope with Helical Focuser
Exposure: Ha 23 x 180s
Gain: 139
Offset 21
Temp: -1 C
Post Processing: PixInsight and Photoshop
https://kurtzeppetello.smugmug.com/

Wednesday, August 15, 2018

First Image with the ZWO ASI1600MM - M27

I decided on the Dumbbell Nebula (M27) or Apple Core Nebula because it was bright and it was perfectly situated so I could image from my observatory rather than setting up from a different part of my lawn.  We have lots of trees so I have to be strategic with imaging.  I tried to image from a different location few nights prior but had all sorts of issues and ended up wasted a clear night so I stayed where the equipment is set up.  It was a good move as I had more issues but this time I was able to resolve them.

I decided to give SGP another try since some of my issues were a result of APT.  I believe I have a curse where software is involved so I ended up using both programs. To make a long story short, APT's live screen frame and focus is not great, in fact I use BYEOS to focus with my Canon 600d, so I set up a sequence in SGP and focused on Vega using a new Bahtinov Mask.  I then started the preset sequence with which included a pre-framed M27 using the plate-solving function.  I followed Chuck's Astrophotography procedure for this.  It worked perfectly - centered right on the object and then... error in starting PHD2!  I started PHD2 manually but it froze the whole program so I had to restart my computer.  Rather than lose another clear night I quickly set up a plan APT which was all I had to do since I was already focused and centered on it.  It worked great, the only other issue I had was in all my fumbling around I forgot to check my temperature.  I was planning on doing it at -15 C, however, when I started it was at -1 C.  Oh well, the images frames were much less noisy than I anything I have ever done before.

The time of the capture plan happened to correspond perfectly to the visibility of M27.  I stacked the frames in PI which aligned everything and did a RGB combination as well as a HaOO combination.  I did a little more processing in PI than I did with the California Nebula before doing the final processing in PS.  In the end, I added the RGB (25% combine) data to the HaOO data to improve the star color.  There is a better way using a star mask but I don't know how to do that, yet!

I am very happy with the final result.  The inner nebula with the white dwarf central star is visible and the faint outer nebulosity is visible.  Although more OIII data might bring this even more, this is a small object to image with a 80 mm refractor so I think I will wait for a new scope to image this again.

HaOO-RGB

HaOO

RGB

HaOO-RGB Wide Field

Comparison
M27 - Dumbbell Nebula-HaOO-RGB
Location: Home Monroe, CT
Date: 8-9-18
Camera: ZWO ASI1600MM-Pro
Telescope: Orion ED80 80mm f/7.5 Apochromatic Refractor Telescope
Barlow: None
Focal Length: 600mm
f/7.5
Focal Reducer: Orion 0.8x Focal Reducer for Refractor Telescopes
Mount: Orion Sirius EQ
Filter Wheel: ZWO EFW 8x 1.25"
Filter: ZWO Red, Green, Blue, Ha, OIII
Autoguiding: QHY-5L-II-M attached to an Agena 50mm Guide Scope with Helical Focuser
Exposure: RGB 15 x 60s, Ha 22 x 180s, OIII 22 x 180s
Gain: 139
Offset 21
Temp: -1 C
Post Processing: PixInsight and Photoshop
https://kurtzeppetello.smugmug.com/

Saturday, August 11, 2018

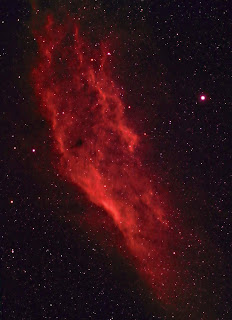
California Nebula in HaRGB - Reprocessed Using PixInsight

This is the same data for the Califoria Nebula (NGC 1499) collected with my modified Canon 600d that I used to produce the image in November (and December) of 2017.  I used DSS for stacking and primarily Photoshop for processing.  I have been happy with using PS and hesitant of PixInsight for the usual reason - hard to learn.  However, I recently obtained a ZWO 1600MM-Pro and think it will be easier in the long run to process the images in PI.  Also, I read a recent Sky and Telescope article by Richard Wright who discussed this very subject.  In a nutshell he recommended learning both.  He made the point PI is not any harder to learn than PS and PI can do certain functions much easier than PS.  Use the right tool for the job mentality.

I have already experienced this in my very limited time using PI.  I stacked both the Ha and RGB data using PI and it produced two images which were aligned.  I believe DSS can do this as well but I did not know it at the time so I spent few hours aligning the Ha and RGB images by hand and eye.  I then combined these images using the NBRGB script function followed by a histogram stretch.  Special thanks goes to Shannon Calvert for helping locate the NBRGB function.  The combined image looked OK.  PixInsight did in 10 minutes what me many hours to do in PS.  I then exported the image to PS and did some of my favorite PS operations on this new rendition.  Why didn't I just continue and process the whole image in PI?  The point was to start using PI not totally switch yet and I wanted to get an image done quickly.  It is going to be a long process in order to learn this program, I imagine over time I will use PS less.

The new image is sharper and show more nebulosity than the original image.  Also, the stars as well as the star colors seem much more real or balanced, at least to me.

Reprocessed - PI and PS

Original - DSS and PS

NGC 1499 - California Nebula-HaRGBLocation: Home Monroe, CT
Date: 11-28-17, 12-20-17
Camera: Canon EOS Rebel T3i(a), Backyard EOS
Telescope: Orion ED80 80mm f/7.5 Apochromatic Refractor Telescope
Barlow: None
Focal Length: 600mm
f/7.5
Focal Reducer: Orion 0.8x Focal Reducer for Refractor Telescopes
Mount: Orion Sirius EQ
Filter: Astrodon UV/IR, Astronomik Ha Clip-filter, UHC-clip
Autoguiding: QHY-5L-II-M attached to an Agena 50mm Guide Scope with Helical Focuser
Exposure: 29 x 120s, 60 x 120s
ISO: 1600
Temp: 8 C, -2 C
Post Processing: Original - Deep Sky Stacker, Photoshop, Astronomy Tools, Lightroom Reprocessed - PI and PS
https://kurtzeppetello.smugmug.com/

Wednesday, August 1, 2018

Altair - First Image with the ASI1600

At long last I have finally broke down and purchased a ZWO ASI1600MM Pro along with the 8 position electronic filter wheel and a complete set of 1.25 inch filters (LRGBHaOS). This will take me quite a while before I get a quality image as there is a lot more to do and learn but I was excited get these first pictures.  They are 30 second exposures at Bin 1x1.  Figure 1 is at 78% gain, Figure 2 is the same image with a slight curve adjustment, Figure 3 is 140% gain, and Figure 4 is with a slight curve adjustment.

Fig 1

Fig 2

Fig 3

Fig 4

Last night was the perfect night for getting started as it was not good enough for real imaging but clear enough to see some stars for a little while anyway.  I first connected a new 7-slot USB hub and connected the camera with the Luminosity filter to the telescope and focused on Altair.   I was ecstatic that everything worked. 

It took a while to get it focused but that is the one difficulty I have been having with APT.  In fact I have been focusing with BYEOS and then using APT to image.  I purchased a Bahtinov Mask but I must be doing something wrong as I ended up getting better focus using the normal Focusing assistant with the Bahtinov mask.

Although it is cloudy I will try to connect up the EFW tonight and see if that works.
I have a long way to go before imaging - 1) find out what Bin actually is or what affect it has, 2) what is the optimal gain setting, 3) how APT changes/advances the filter wheel.

And then after that, processing...